
How to install and set up EstVis
This guide will walk you through the installation and initial setup of two key components of the EstVis system: Desktop Server and Workflow. It also includes instructions on how to get started with the mobile app.
What is Desktop Server?
Desktop Server is a Windows application that acts as your local server. It stores and manages all the data related to your body shop, including:
- Work orders (cases)
- Customer and vehicle information
- Photo documentation
- Work authorizations
- Invoices
- And many other records
Once installed and configured, you don’t need to interact with it directly. Just make sure it runs in the background at all times, even after restarting the computer (autorun is enabled by default).
You’ll only need to access it occasionally – for example, when updating settings or integrating with third-party software.
What is Workflow?
Workflow is the main application users interact with daily. It provides multiple easy-to-use interfaces for managing tasks like:
- Editing estimates
- Managing photo documentation
- Generating invoices
- Handling parts and payroll
The available features depend on the user role (e.g., manager, technician, painter).
Unlike Desktop Server (which runs once per the whole company), you can run multiple instances of Workflow, one for each user. Each instance must be launched using the correct user credentials.
Step 1: Install Desktop Server
Download EstVis Desktop Server:
- Go to https://estvis.com.
- Click Download in the top menu.
- Select Desktop Server.
- Wait for the installer to download.
Install EstVis Desktop Server:
- Double-click the downloaded file to start the installation.
- Follow the on-screen instructions.
- At the end of the installation, you'll be offered the option to install EstVis Workflow as well (recommended).
⚠️ Note: Workflow requires Windows 8 or later and .NET Framework 4.8 or newer. If you don't have .NET installed, the installer will notify you and help you install it.
- The first time you launch Desktop Server may take longer than usual while it initializes and creates the local database.
- Once ready, you’ll be asked to enter system credentials. These are not your personal login details. Use the system credentials provided in Email #3 titled "Welcome to EstVis | Step 2 of 2".
Step 2: Install Workflow
Download EstVis Workflow:
- Visit https://estvis.com.
- Click Download in the top menu.
- Choose Workflow.
- Download the installer.
Install EstVis Workflow
- Run the downloaded file.
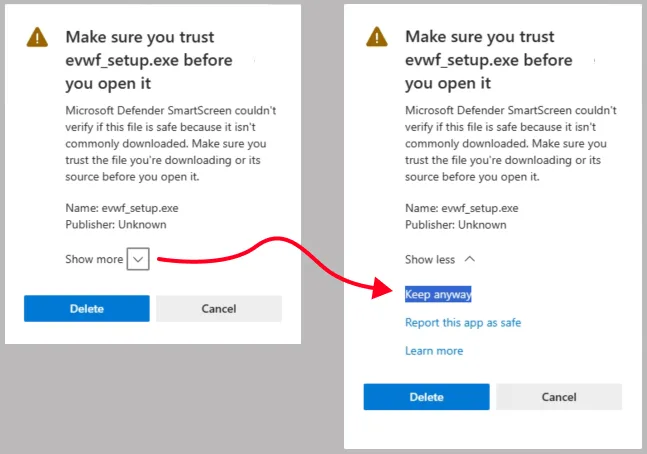
- On some systems, Microsoft Defender SmartScreen might warn that the file isn’t verified.
If this happens, click Show more at the bottom of the warning window. Then click Keep anyway to continue.
- Proceed with the installation and follow the on-screen instructions.
After installation, open the Workflow app. You’ll see a login screen.
- If you already created a user account, log in with those credentials.
- Otherwise, use the manager (administrative) credentials from Email #2 titled "Welcome to EstVis | Step 1 of 2".
Mobile app
To get the most out of EstVis, we recommend downloading the EstVis mobile app, available for iOS and Android. It helps streamline many business processes, such as:
- Taking and uploading photos
- Creating and signing invoices
- Scanning VIN and DRL codes
- Signing documents digitally
Download the app from the App Store or Google Play and log in using your EstVis account.
If you need any help during installation or setup, feel free to contact our support team via support@estvis.com or live chat available on estvis.com.